
Friend’s using the Folder Redirection policy in your Active Directory domain Environment, you can redirect the locations of various folders like Desktop, Documents, Downloads, Pictures, AppData, and others to be stored on your server. Your users won’t even realize that their data is being directly saved on the server. In today’s Post, I’m going to tell you how you can Configure Folder Redirection Policy in Windows Server For AD Users.
The biggest advantage of Folder Redirection policy is that any user can log in to any computer within your domain environment and they will have their data readily available on that computer. There’s no need to use pen drives or external hard drives since all data is saved directly on the server. Users will think that their data is being stored on their local computer, but in reality, anything they save on their Desktop, Documents, Downloads, Pictures, and more, will be directly saved to the server location where you’ve redirected their folders. This helps centralize data management, improves data security, and simplifies backups.
Also Check This :- Windows Server 2022 Features and Types
Steps to Configure Folder Redirection Policy in Windows Server For AD Users
- First of all, Create a Shared Folder in Server and Share it with Domain Users and Administrators.
- On your Windows Server, Go to the “Server Manager” and then Go to “Tools” and open “Group Policy Management “.
- In the Group Policy Management, navigate to the “Group Policy Objects” container. Here, you can either create a new GPO specifically for folder redirection or select an existing one that you want to use. I suggest you create a separate GPO for Every Policy you created.
- Then Right-click on the chosen or newly created GPO and select “Edit” to open the Group Policy Management Editor.
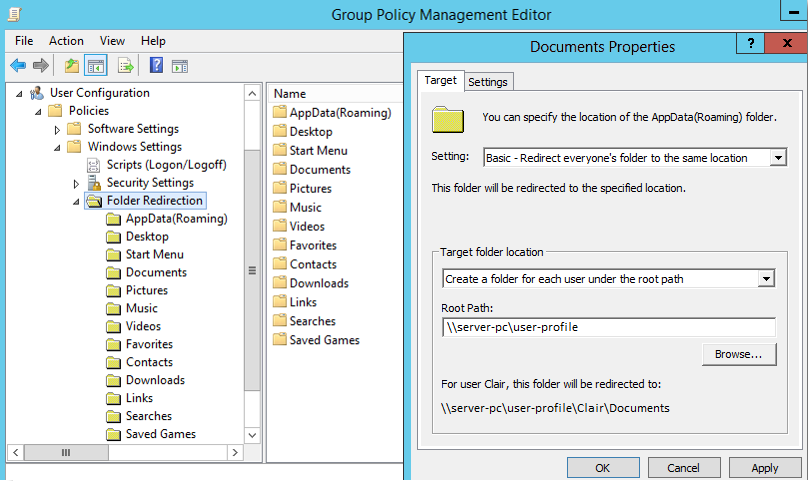
- In the Group Policy Management Editor, navigate to “User Configuration” > “Policies” > “Windows Settings” > “Folder Redirection“.
- Right-click on a folder ( for example:- Desktop, Downloads Documents, Pictures, etc.) that you want to redirect and then choose “Properties“.
- In the Properties window, select the “Basic” option, Then in the Target Folder location Select the First option which is “Create a folder for each user under the root path“.
- Then in the Root Path enter the Shared Folder Location (“\\server-pc\user-profiles”) which you created earlier,
- Then Go to the Setting Tab and Select the second option (“Move the Contents of Document to the New Location “) in
- If you want to ensure that users have exclusive access to their redirected folders, then select the first option also “Grant the user exclusive rights to the redirected folder“, This prevents other users from accessing someone else’s redirected folders.
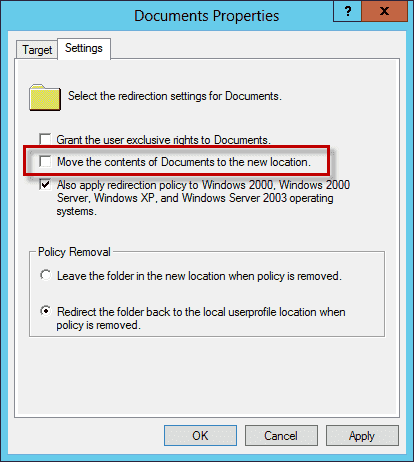
- Then in the policy remove section Select the second option “Redirect the Folder Back to the Local user profile location when the policy is removed“
- Then Click on Apply and then click on ok.
- Then Close the Group Policy Management Editor and link the Folder Redirection GPO to the appropriate Organizational Unit (OU) that contains the users you want to apply the folder redirection policy to. To do this, right-click on the OU, select “Link an Existing GPO,” and choose the GPO you just created and edited.
- After linking the GPO, you can either wait for the policy to be applied automatically during the next Group Policy update interval, or you can manually update the Group Policy settings on the client and server machines by running the “gpupdate /force” command in the Command Prompt.
Now, the Folder Redirection Policy in Windows Server For AD Users will be applied to the designated OU users, and their selected folders will be redirected to the specified target location. Keep in mind that users might need to log off and log back in for the folder redirection to take effect.
If you are facing any issues while configuring the Group Policies in Windows Server Just Comment Below we will definitely help you to resolve the issue.
