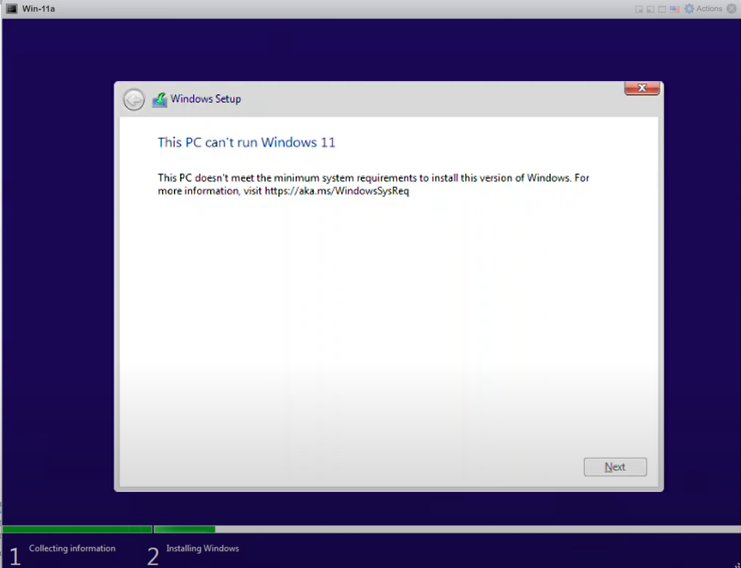
VMware ESXi is a powerful hypervisor that allows users to create and manage virtual machines (VMs) with ease. If you’re looking to run Windows 11 in a virtualized environment, ESXi is a great choice. But some versions of VMware ESXi, such as 7.0, does not have option to choose Windows 11 while creating a VM. But you can select Windows 10 64-bit option during VM creation, but this can lead to an error stating “This PC can’t run Windows 11” due to the lack of TPM 2.0 support.
In this guide, I’ll tell you the Step by Step guide to Install Windows 11 on VMware ESXi Without TPM 2.0 Check.
Prerequisites to Install Windows 11 on VMware ESXi
- Your ESXi server should be up and running.
- Download the Windows 11 ISO file from Microsoft’s official website.
- Upload Windows 11 ISO in VMware ESXi.
- Basic Knowledge of Registry Editing:
Steps to Install Windows 11 on VMware ESXi Without TPM 2.0 Checks
Step 1: Upload the Windows 11 ISO to ESXi
- Log in to ESXi Host Client: Open your web browser and navigate to the IP address of your ESXi host. Log in with your credentials.
- Upload ISO File: Click on “Storage” in the left-hand menu. Select the datastore where you want to upload the ISO, then click on the “Files” tab, Click “Upload” and choose the Windows 11 ISO file from your local machine.
- Wait for the upload to complete.
Step 2: Create a New Virtual Machine of Windows 11
- Start VM Creation Wizard: In the ESXi Host, go to “Virtual Machines” and click “Create / Register VM”.
- Configure VM Settings: Enter a name for your VM (e.g., “Windows 11 VM”).
- Compatibility: Select the appropriate compatibility for ESXi 7.0.
- Guest OS Family: Choose “Microsoft Windows”.
- Guest OS Version: Select “Windows 10 (64-bit)”.

- Click “Next”.
- Select a Datastore: Choose the datastore where the VM files will be stored and click “Next”.

- Configure Hardware: Allocate resources. Windows 11 requires at least 4 GB of RAM and 1 GHz of processor speed. then Set a virtual hard disk size of at least 64 GB. then configure network settings. as per your requirements.
- CD/DVD Drive: Choose “Datastore ISO file” in CD/DVD Drive and select the Windows 11 ISO you uploaded.
- Click “Finish” to create the VM.
Step 3: Modify the Windows Registry During Installation
- Power On the VM: Go to “Virtual Machines”, select your newly created VM, and click “Power on”.
- Open the Console: Click on “Console” to view the VM’s display.
- Start Windows Installation: The VM will boot from the Windows 11 ISO. Proceed through the initial setup until you reach the screen where you can select your language and keyboard settings. Click “Next”, then “Install Now”, then you will get an error ”This PC can’t run Windows 11”, Just ignore it and open the command prompt by following below mentioned steps.
- Access Command Prompt: Press Shift + F10 to open the Command Prompt.
- Edit the Registry: In Command Prompt, type regedit and hit Enter to open the Registry Editor.

- Navigate to the Registry Key: In Registry Editor, navigate to HKEY_LOCAL_MACHINE\SYSTEM\Setup.
- Create New Registry Keys: Right-click on ”Setup”, select New —> then select ”Key”, and name it LabConfig
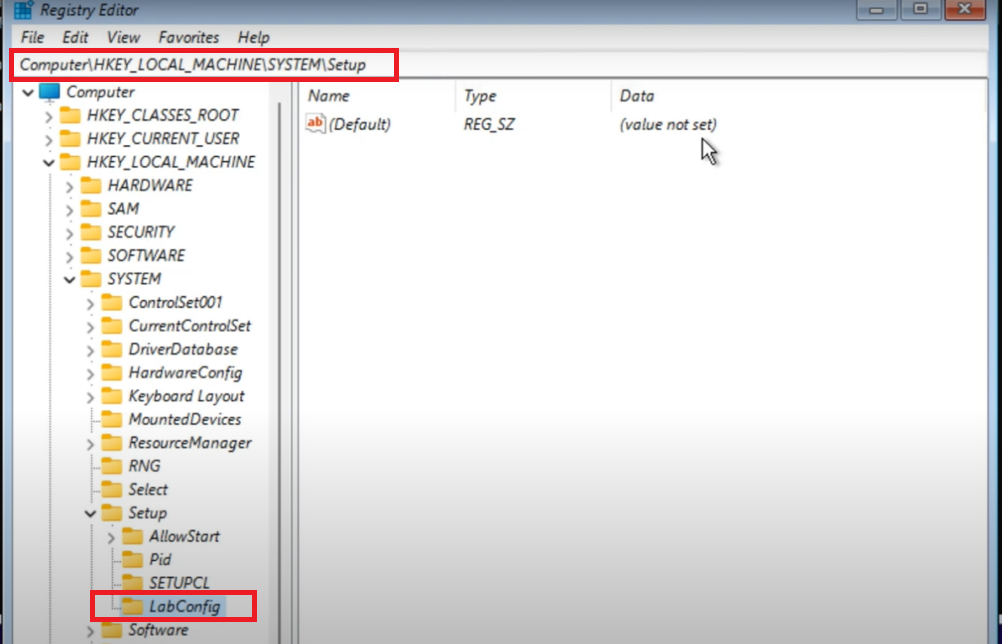
- Select newly created key ”LabConfig”, right-click in the right pane, select New —> DWORD (32-bit) Value, and create the following entry: BypassTPMCheck


- Then Right Click on BypassTPMCheck and set value to ”1”.

- Close Registry Editor and Command Prompt: Close Registry Editor and Command Prompt by typing exit.
- Continue Installation: Just go one step back from where you got an error ”This PC can’t run Windows 11” and click again on Install button and now you can install windows 11 without checking TPM 2.0 on VMware ESXi.

You have successfully installed Windows 11 on VMware ESXi by bypassing the TPM check using the registry editor. This method is useful for testing or development environments where TPM support is not available. Remember to always back up your system before making registry changes and to follow best practices for system security.
